You can make an InfoPath form fully trusted by either creating an msi file or digitally signing it.
(1) In order to create an msi file refer the following article:
http://msdn.microsoft.com/librarydefault.asp?url=/library/en-us/ipsdk/html/ipsdkUnderstandingFullyTrustedForms_HV01073332.asp
(2) For digitally signing the form:
Add “Full Trust” and “Sign the XSN” with a digital certificate
A. From the Tools menu, choose Form Options
B. Select the Security Tab
C. Uncheck the option “Automatically determine security level...” and enable the “Full Trust” option
D. Enable the “Sign this form” option and either select or create a digital certificate. **
** If you choose to “Create” a certificate, this creates a “self-cert” which is only valid on the machine in which it was created.
Refer the following articles to know more on getting a certificate from trusted authority so that it will be valid on all the machines within the intranet:
(a) Cryptography for Network and Information Security
http://www.microsoft.com/resources/documentation/Windows/2000/server/reskit/en-us/Default.asp?url=/resources/documentation/Windows/2000/server/reskit/en-us/distrib/dsch_key_msjr.asp
(b) Setting up a Certificate Authority
http://msdn.microsoft.com/library/default.asp?url=/library/en-us/xmlsdk/html/29ff74a2-249a-4ecf-8a2a-ff0ba572e4db.asp
(c) Building an Enterprise Root Certification Authority in Small and Medium Businesses
http://www.microsoft.com/technet/security/prodtech/windowsserver2003/build_ent_root_ca.mspx
In order to know if the certificate has been successfully installed on the system; do the following:
Go to Start à Run à type “certmgr.msc”
This will open up “Certificates” window.
Select “Trusted Root Authorities” à Certificates
** Once you are done with this, follow the steps specified in the article below for publishing/deploying a fully trusted form to Share point site:
http://msdn.microsoft.com/library/en-us/ipsdk/html/ipsdkDeployURNFormToSharePoint_HV01086376.asp
Wednesday, July 30, 2008
Domain Certificate Authority Signing InfoPath 2007 Forms
InfoPath forms with custom code and those that have their Security Level set to Full Trust must be signed so that they can be run by the client. That’s fine but who wants to pay for a code signing certificate for internally developed applications? If we string together a couple of facts we can quickly realize that we shouldn’t have to pay for code signing certificate if we are developing code that will only ever be used by internal users.
First, certificates work because there are a set of trusted root certificate authorities. Their responsibility is to issue certificates. The organizations running the trusted root certificate authorities are responsible for only issuing certificates where the certificate matches the organization requesting the certificate. They make no judgment about whether the person is good or bad – only that they are who they say they are. The service that you pay for when you purchase a certificate from a trusted root certificate authority is that they have verified your identity.
Microsoft Windows has a list of trusted root certificate authorities – but when a computer is in a domain, it automatically trusts the Enterprise Certificate Authority for the domain. The Enterprise certificate authority is an instance of certificate services which comes with Windows Server operating systems. It allows an administrator to issue certificates. There are several templates for the kinds of certificates to be issued. The most common one is for a web server – an SSL certificate – but there are others as well.
Certificate Services has a template for code signing certificates. If you put everything together you realize that when all of your computers are a member of a domain you can request and get granted a code signing certificate that’s valid for anyone using the certificate in the domain.
Here’s how to do it…
Install Certificate Services
If you don’t have an Enterprise Certificate Authority in your domain, go to a server and …
1) Click Start- Control Panel-Add/Remove Programs
2) Click Windows Components
3) Click the checkmark to the left of Certificate Services
4) Click Next
5) Follow the wizard to create an Enterprise Certificate Authority.
Note: There are special precautions for protecting enterprise certificate authorities including creating sub-authorities, and taking the certificate authority offline. If your organization is large, you should review the risks and guidelines for creating certificate authorities and manage security appropriately. In smaller organizations it’s generally acceptable to create an enterprise CA and issue certificates from it.
Create a Copy of the Code Signing Template
The default out of box code signing certificate doesn’t allow the certificate’s private key to be exported. This means that only the user to which the certificate is issued can use it. Generally you don’t want to have developers to have enough permission to request the certificate themselves. If you want to be able to move the certificate from user to another you’ll need to make a copy of the Code Signing certificate and change it so it can have exportable keys. We’re going to show you how to do this. If you follow these steps choose your duplicated code signing certificate in the following steps.
1) Click Start-Run and enter certtmpl.msc.
2) Right click the Code Signing template and select Duplicate.
3) Enter a name for the new Template. For instance, add your organization name in front.
4) Click the Request Handling tab.
5) Click the Allow private key to be exported.
6) Click OK.
You now have your own code signing template that can be exported.
Enable the Code Signing Template
By default the code signing certificate template isn’t available to be issued from your certificate authority. To do that you need to enable the template which you can do by following these steps…
1) Click Start-Administrative Tools-Certification Authority
2) Expand the server that you installed certificate services on
3) Click the Certificate Templates folder.
4) Right click the Certificate Templates folder, select New, Certificate Template to Issue.
5) Click Code Signing and click the OK button.
Now you can issue Code Signing Certificates
Issue the Certificate
Now that everything is in place you can issue the certificate. Follow these steps to do that…
1) Open a web browser and navigate to http://server/certsrv where server is the name of the server which you installed certificate services.
2) Click the Request a certificate link
3) Click the advanced certificate request link
4) Click the Create and submit a request to this CA link
5) In the certificate template drop down box select Code Signing.
6) Enter a friendly name for the certificate in the friendly name textbox at the end of the page.
7) Click Submit. You may be prompted that the web site is requesting a certificate, click Yes.
8) Click the Install Certificate link. Again you may be warned that you’re getting a certificate, click Yes.
You now have a certificate in your certificates store. If you’ve not been doing this as the developer (and you probably haven’t), you’ll need to export the certificate and import it into the developer’s account. You’ll only be able to do this if you created your own code signing template.
Exporting the Certificate
Here’s what you need to do to export the certificate:
1) Click Start-Run enter certmgr.msc
2) Expand the Personal Folder
3) Expand the Certificates folder
4) Locate the certificate that indicates that its intended purposes is Code Signing.
5) Right click on that item and select All Tasks-Export
6) Click Next
7) Click Yes, export the private key.
8) Click Next.
9) Click Next
10) Enter a password and confirm password.
11) Click Next
12) Enter a file name for the exported file
13) Click Next
14) Click Finish
You’ve exported the certificate.
Importing the Certificate
If you’ve exported the certificate you can move that over to the user or machine that will be signing the code and follow these steps to import the certificate.
1) Double click the file to start the Certificate Import Wizard.
2) Click Next
3) Click Next
4) Enter the password you entered when you exported the file.
5) Click Mark the key as exportable.
6) Click Next
7) Click Next
8) Click Finish
9) Click OK.
You’ve now imported the certificate file.
Configure InfoPath to Use the Certificate
The final step in this journey is to tell InfoPath to use the certificate. Do that by following these steps…
1) Open an InfoPath form in design view.
2) Click Tools-Form Options
3) In the category pane, click Security and Trust
4) Click Sign this form template
5) Click the Select Certificate button
6) Select the certificate that you just issued.
7) Click OK.
8) Click OK.
OK, you’re done. That’s all you need to do in order to get a code signing certificate that will sign InfoPath forms that the users of the organization will recognize.
Tuesday, July 15, 2008
Changing Workflow Default Forms
Its very easy to change workflow default forms. I mean the association form, Initiation form or the task list form.
Association Form
To change the association form simply open Your workflow Project and open the file name "Workflow.xml".
In Workflow Tag before ending add Association Fomr Url as:
AssociationUrl="_layouts/MyAssocForm.aspx"
In MetaData Tag Under the "Association_FormURN" element add the Form URL.
Initally it will be commented you have to uncomment it.
Instantiation Form
Similarly to change the Instantiation form
In Workflow Tag before ending add Instantiation Fomr Url as:
InstantiationUrl="_layouts/MyInitForm.aspx"
enter Your Form Id in Workflow.xml under MetData Tag in "Instantiation_FormURN"
Don't forget to uncomment it
TaksList Forms
To change task lists form you have to write some extra code other than adding your form Id in Workflow.xml
just write write these lines in Your "OnTaskCreated" Event
private void OnTaskCreated(object sender, EventArgs e)
{
createTask1_TaskProperties1.Title = "Demo Task";
createTask1_TaskProperties1.AssignedTo = @"UserName";
createTask1_TaskProperties1.Description = "This is a demo task";
createTask1_TaskProperties1.TaskType = 0;
}
And that is it. feel free to ask questions if you find any problem.
Friday, July 11, 2008
Programmatically adding Rows in a Repeating Table of InfoPath Forms
Its very easy to programmatically add rows in a repeating table of InfoPath Forms. Just follow these steps:
"NODEPATH" is the XPath of the Repeating table you have copied
XPathNavigator Group = MainDataSource.CreateNavigator().SelectSingleNode("NODEPATH", NamespaceManager);
XPathNavigator newRow = Group.Clone();
newRow.InsertAfter(Group);
Hope this will be helpful for you. You are most welcome for Queries and Suggestions.
- Add a repeating table to your InforPath Form.
- Select the Repeating table and while selecting it come on Tasks Pane, and click Data Source.
- You will see the selected Repeating table group in Data Source, right click on the repeating table group and copy the XPath. Save this Path somewhere.
- Now Add a button on You InfoPath form having text "Add Rows".
- Right click that button and click programming --> Changed Event.
- A separate C# code file will open in Visual Studio with the changed Event Registered.
- Write this code in the Event Handler Function. And that is it! You have learned to programmatically add rows in Repeating table.
"NODEPATH" is the XPath of the Repeating table you have copied
XPathNavigator Group = MainDataSource.CreateNavigator().SelectSingleNode("NODEPATH", NamespaceManager);
XPathNavigator newRow = Group.Clone();
newRow.InsertAfter(Group);
Hope this will be helpful for you. You are most welcome for Queries and Suggestions.
Thursday, July 10, 2008
Building Custom Workflows for InfoPath Forms
While SharePoint Designer is not a part of either the WSS 3.0 or MOSS 2007 installation, nor is it included with any of the current versions of Microsoft Office, it is a great tool for working with SharePoint that most administrators and designers typically will require. While SharePoint Designer can trace its roots back to the days of Microsoft FrontPage, it provides much more functionality than FrontPage. One of those areas of new functionality pertains to the creation of workflows for InfoPath forms published to a web page.
Beginning a Simple Approval Workflow
To illustrate the concept of building a workflow for a form, let’s build a simple approval workflow for a bid request form. I will keep this process relatively simple while showing how easy it is for you to build workflows for your libraries.
To begin a new workflow, open SharePoint Designer from your Start menu. Before you can start a new workflow, you have to select the site where you want to work. If you have not used SharePoint Designer previously, you will have to open a site by selecting the option Open Site from the File menu. Otherwise, you may be able to select the site from the Recent Sites menu option, also in the File menu. If you do not see the site in Recent Sites, you may still see a reference to it in the Open Site option. In any case, you can use the Open Site option to enter the URL of the site to open it. For example, for my server, I might enter
http://stargazer/
Next, select New also from the File menu and select Workflow. Designer may display a message informing you that it is downloading necessary data from the server. This process can take a varying amount of time, depending on the speed of your network. This menu option opens the dialog box shown in Figure 1. In this menu, you must provide a name for the workflow. When you add a workflow to a SharePoint site using SharePoint Designer, you can attach it to a specific list, as you will do here. You can select in which list to install the workflow by selecting it from the drop-down of all the lists in the selected site.
Figure 1. Creating a new workflow using SharePoint Designer
The last section of this page lets you choose how and when you want to start the workflow for the selected list. If you check the first check box, the user must start the workflow manually for the item. Use this option only if you do not need to start the workflow when an item is added or changed, and only if the average user will know when to and when not to start a workflow. For example, you may want the user to be able to create items in a list or library while she works on them over several sessions without starting a workflow until she finishes working on the item. Only at that time will the user want to start the workflow on the completed item.
The second check box tells SharePoint to automatically start the workflow whenever someone creates a new item in the select list. This means that even if the user has not finished entering the item but wants to save what he did so he can finish at a later time, the mere fact that he saved his temporary work will fire off the workflow. If users typically complete the entry of all data for the form in a single session, maybe you do want to select this option to start the workflow when they create the item.
The third check box starts the workflow whenever an item changes. This feature can help ensure that users do not make changes to items without starting an approval process. Otherwise,users might submit an initial item, get it approved, and then return to edit the item without needing approval of their changes.
When you click Next, you can begin the first step of the workflow as shown in Figure 2.SharePoint Designer provides a default name for each step beginning with “Step” followed by a sequential number. However, you can change the step name to some more meaningful text such as Send E-mail to Approver.
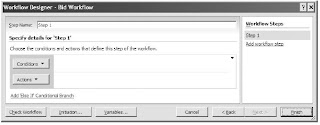
Figure 2. Workflows have steps containing actions executed based on conditions.
Defining Workflow Details
Each step consists of one or more sets of details. Each detail consists of a condition and an action that you want the workflow to perform when the condition evaluates to True. Condition statements are optional. If you want to execute a specific action every time the workflow runs, you can skip the condition and go directly to the Actions button. Therefore, let’s first look at the Actions button. When you click the Actions button, a drop-down list of possible actions appears, as shown in Figure 3. As you can see from the list, you have quite a set of options available. In fact, there are so many options that the drop-down includes an option at the bottom to show more actions than you can see in the initial list.

Figure 3. Selecting from the available actions drop-down list

Figure 4. Creating an action that sends an e-mail message
Clicking the link for this placeholder opens a dialog box to define the e-mail message shown in Figure 5. Here you can enter the e-mail address of a person directly, or you can click the button to the right of the text box on the To: line to select from the users or user groups known to the SharePoint site. For example, if you have a group defined as Approvers, you can select this SharePoint group, rather than the e-mail address of an individual, to receive the email.
This is usually the preferred solution over entering individual e-mail addresses as shown in this figure, because you can easily e-mail multiple people who have the approver permission, letting any one of them approve the item. Also, if you hard-code an individual’s e-mail address in a workflow, and that person leaves the organization, the workflow will fail until you edit the workflow and replace the invalid e-mail address with a new e-mail address. By referencing a group, you simply have to maintain the group’s membership. This also applies to the CC: line of the e-mail. By default, the FROM: address for the e-mail can be set in the Central Administration’s Operations page. Go to the Outgoing e-mail settings option and update the From Address field.

Beginning a Simple Approval Workflow
To illustrate the concept of building a workflow for a form, let’s build a simple approval workflow for a bid request form. I will keep this process relatively simple while showing how easy it is for you to build workflows for your libraries.
To begin a new workflow, open SharePoint Designer from your Start menu. Before you can start a new workflow, you have to select the site where you want to work. If you have not used SharePoint Designer previously, you will have to open a site by selecting the option Open Site from the File menu. Otherwise, you may be able to select the site from the Recent Sites menu option, also in the File menu. If you do not see the site in Recent Sites, you may still see a reference to it in the Open Site option. In any case, you can use the Open Site option to enter the URL of the site to open it. For example, for my server, I might enter
http://stargazer/
Next, select New also from the File menu and select Workflow. Designer may display a message informing you that it is downloading necessary data from the server. This process can take a varying amount of time, depending on the speed of your network. This menu option opens the dialog box shown in Figure 1. In this menu, you must provide a name for the workflow. When you add a workflow to a SharePoint site using SharePoint Designer, you can attach it to a specific list, as you will do here. You can select in which list to install the workflow by selecting it from the drop-down of all the lists in the selected site.
Figure 1. Creating a new workflow using SharePoint Designer
The last section of this page lets you choose how and when you want to start the workflow for the selected list. If you check the first check box, the user must start the workflow manually for the item. Use this option only if you do not need to start the workflow when an item is added or changed, and only if the average user will know when to and when not to start a workflow. For example, you may want the user to be able to create items in a list or library while she works on them over several sessions without starting a workflow until she finishes working on the item. Only at that time will the user want to start the workflow on the completed item.
The second check box tells SharePoint to automatically start the workflow whenever someone creates a new item in the select list. This means that even if the user has not finished entering the item but wants to save what he did so he can finish at a later time, the mere fact that he saved his temporary work will fire off the workflow. If users typically complete the entry of all data for the form in a single session, maybe you do want to select this option to start the workflow when they create the item.
The third check box starts the workflow whenever an item changes. This feature can help ensure that users do not make changes to items without starting an approval process. Otherwise,users might submit an initial item, get it approved, and then return to edit the item without needing approval of their changes.
When you click Next, you can begin the first step of the workflow as shown in Figure 2.SharePoint Designer provides a default name for each step beginning with “Step” followed by a sequential number. However, you can change the step name to some more meaningful text such as Send E-mail to Approver.

Figure 2. Workflows have steps containing actions executed based on conditions.
Defining Workflow Details
Each step consists of one or more sets of details. Each detail consists of a condition and an action that you want the workflow to perform when the condition evaluates to True. Condition statements are optional. If you want to execute a specific action every time the workflow runs, you can skip the condition and go directly to the Actions button. Therefore, let’s first look at the Actions button. When you click the Actions button, a drop-down list of possible actions appears, as shown in Figure 3. As you can see from the list, you have quite a set of options available. In fact, there are so many options that the drop-down includes an option at the bottom to show more actions than you can see in the initial list.

Figure 3. Selecting from the available actions drop-down list
In this case, you want to build a simple approval workflow. Therefore, the first action you want the workflow to perform when a user saves a new item to the list is to send an e-mail to the approver for the list. Therefore, select the first option: Send an Email.
Configuring an E-mail Message
This option then displays the skeleton command for the e-mail action shown in Figure 4 in the text area to the right of the buttons. Each command has one or more placeholder text strings that you can replace with data. In this case, the placeholder contains the text Email this message. Notice that the words “this message” in the placeholder appear as a link. This formatting tells you that you can customize the information that appears at this point in the command.

Figure 4. Creating an action that sends an e-mail message
Clicking the link for this placeholder opens a dialog box to define the e-mail message shown in Figure 5. Here you can enter the e-mail address of a person directly, or you can click the button to the right of the text box on the To: line to select from the users or user groups known to the SharePoint site. For example, if you have a group defined as Approvers, you can select this SharePoint group, rather than the e-mail address of an individual, to receive the email.
This is usually the preferred solution over entering individual e-mail addresses as shown in this figure, because you can easily e-mail multiple people who have the approver permission, letting any one of them approve the item. Also, if you hard-code an individual’s e-mail address in a workflow, and that person leaves the organization, the workflow will fail until you edit the workflow and replace the invalid e-mail address with a new e-mail address. By referencing a group, you simply have to maintain the group’s membership. This also applies to the CC: line of the e-mail. By default, the FROM: address for the e-mail can be set in the Central Administration’s Operations page. Go to the Outgoing e-mail settings option and update the From Address field.

Figure 5. Defining the properties and content of the e-mail message
Next, you can enter a text string to appear in the Subject field. You can enter a simple text string as shown in Figure 10-42, or at any point within the text string, you can click the function button found to the right of the Subject field. This opens a dialog box that lets you look up a value from a variety of sources ranging from fields in the current item, to fields in other lists. If you choose to use a value from another list, you must identify the item and the field from the list that you want to use.In fact, the body of the message in Figure 5 shows several reference fields. In the first paragraph of the body, the string [%Request for Bids:RFB Number%] retrieves the value from the RFB Number column of the current item and inserts it into the string. Similarly, it also retrieves values from the column RFB Responder Name and the column Created By. In this way, you can create a custom message that tells the e-mail recipient more than just that she has something to approve on the portal. You can provide specific information to tell her exactly what she needs to approve. You can even provide a link to the list so that the user does not have to try to remember the URL and then navigate to the required list, all of which takes extra time for the approver. By displaying the URL in the e-mail to the approver, you increase the approver’s efficiency. When you click OK, SharePoint Designer returns you to the Step page, shown in Figure 6,where you can add more actions.
Figure 6. Actions without a condition always execute.
Adding Multiple Actions
You can have multiple steps each with individual actions, or you can have a single step with multiple actions. Suppose you decide to add another action to this step to log the workflow into the History list. To do this, click the Actions button a second time, and click the option Log to History List, as shown in Figure 7. For this action, you can specify the exact text you want to add to the log.
Figure 7. Adding actions from the full action list
Next, add a third action telling the workflow to wait until the approval process changes from Pending to another value. The need for this action may not be obvious until you consider that workflows execute from beginning to end once they start without pausing, unless you tell them to pause. In fact, currently the workflow defined here will execute as soon as an item is added or changed in the list where the workflow has been attached. It starts by sending an e-mail to the person or group defined in the TO: portion of the e-mail definition and then creates a log entry. In the next step, you want to determine whether the approver sets the item’s status to Approved or Rejected. If you do not put a pause or wait action at the end of step 1, step 2 will immediately execute without giving the approver time to even look at the item. Therefore, you need to add an action telling the workflow to wait at this point until the item’s status changes from its initial value of Pending.
Adding Conditions to Actions
To be complete, you can add a condition that defines when you want even the actions in step 1 to execute. In this case, you only want to send an e-mail to the approver when a document has the status of Pending. If you have a list with versioning turned on, this allows you to save intermediate values without triggering a workflow, because they have the status of Draft and only receive a status of Pending when the user submits them for approval. To add this condition, click the Conditions button for the first step. From the drop-down list, shown in Figure 8, select the option Compare Request for Bids field.
Figure 8. Conditions define when to execute the actions in the step.
When you select this option, the command skeleton in the condition that appears to the right of the condition button says
If field equals value
In this case, you see that SharePoint Designer underlines three of these words. When you click the first word, field, you can select which field you want to compare from the current list item. Depending on the field that you select, the drop-down list that appears when you click the word value changes. SharePoint Designer reads the definition of the list, and if the selected field has a limited number of possible values, it only displays those values. For fields that can have any value, SharePoint Designer lets you enter the value directly in the text box. You can even reference a value from another object such as another list on the site.Even the word equals between field and value can be changed by clicking it, providing you with different comparison options. If necessary, you can build multiple conditions in which you can connect each condition, using either an AND or an OR connection. Figure 9 shows one possible way to complete the first step of the approver workflow. It sends the approver an e-mail and logs the start of the workflow when a new or edited document with the status of Pending appears in the list.
Figure 9. One way to define the step to send an e-mail to an approver
Adding Additional Steps
By clicking the hyperlink Add workflow step in the panel on the right side of SharePoint Designer,which shows the Workflow Steps, you can define what you want the workflow to do when the approver changes the status of the item to either Approved or Rejected.
For this step in the workflow, let’s define a condition that checks whether the Approval Status field of the current item equals Approved. When it does, let’s send an e-mail back to the person who created the item, informing him that the item has been approved. Begin by clicking the Conditions button and select the option Compare Request for Bids field as you did for the condition in the first step of this workflow. Then select the field Approval Status and compare it to the value Approved. Next, create an action that sends an e-mail. In the e-mail dialog box, click the Select Users button on the far-right side of the To: field and select User who created current item from the list of available users and groups list, as shown in Figure 10.
Figure 10. Using dynamic properties to define an e-mail’s To: field
In this step, you need to have a second condition, because the approver can either accept or reject the item. The first condition/action set defines what to do when the approver approves the item. But next you must define what you want the workflow to do when the approver rejects the item. To do this, click the hyperlink Add ‘Else If’ Conditional Branch found at the bottom of the Specify Details panel. You will see a new Conditions and Actions set of buttons. Click the Conditions button and define the Boolean expression that compares the Approval Status to the value of Rejected. Next, click the Actions button to send the user who created the current item an e-mail informing him that the approver has rejected the item.
■Tip An interesting process you can create places all pending items of a specific type in an initial pending list. When a user creates an item in this list, it starts a modified approval workflow. In this workflow, add an action to the Approved step to copy the list item to a different list, an approved item list, followed by another action to delete the current item from the current list. If the approver rejects the item, you can leave the item in the pending list.
Figure 11 shows one possible way to build the second step in this approval workflow.
Figure 11. Defining the approver’s possible actions
■Tip If you ever create your workflow steps out of order, you can easily rearrange their order by positioning your mouse over the right side of the step name in the Workflow Steps panel until the drop-down arrow appears. Click this arrow, and then select either the Move Step Up option or the Move Step Down option.
■Tip If you miss a step, just add the step to the end of the steps. Then using the previous tip, move it up in the list of steps to the spot where it belongs.
■Tip If you decide you no longer need a workflow step, open the drop-down list of step options as described in the previous tips and select the Delete Step option.
Restructuring Your Conditions
If you add a conditional branch that you later decide you no longer need, you can click the down pointing arrow to the upper right of any of the existing conditional branches to display a drop-down menu. From this menu, you can move conditional branches up or down in the sequence of branches. Remember that workflows evaluate branches sequentially from top to bottom by default, with the first branch that returns a True result for its condition being chosen to execute its actions. You also have options in this menu to add new branches, delete the current branch, or change the way the workflow executes conditional branches to execute them all in parallel rather than sequentially.
If you have a condition or action with multiple statements, you can also change the order of these statements by clicking anywhere on the line of the statement other than on a hyperlink to select the condition or action. To the right appears a drop-down button that, when clicked, displays a menu letting you move the current action or condition up or down or even delete it.
Therefore, even if you miss a condition or action, you can simply add it to the bottom of the list of actions or conditions in the appropriate conditional branch, and then move it to the position where it needs to appear.
■Tip One of the conditions you can use compares the file size to a specific range in kilobytes. You can use this condition to automatically set the approval status to Approved or Rejected along with sending appropriate e-mail messages to users attempting to add large files to lists.
■Tip Another condition you can use compares the file type to a specific type. By including a series of conditions joined with an OR connector, you can limit the ability of users from uploading specific file types to lists and libraries.
When you finish defining the steps in your workflow, save the workflow by clicking the Finish button in the lower-right corner of the SharePoint Designer. This action saves the workflow to SharePoint and specifically attaches it to the list specified when you started the workflow definition. The next time a user adds an item to the list, the workflow initiates and sends an e-mail,
such as the one shown in Figure 12, to the person or group defined in the To: field.
Figure 12. An example of the e-mail received by the approver
While this section introduces you to the ability of SharePoint Designer to create workflows, you can create workflows quite a bit more complex than the one shown here. If you find that you need to perform actions that SharePoint Designer does not support, you can also create workflows using Visual Studio and add custom coding for individual forms; in addition, you can create workflows that can be installed at the site’s collection level and then applied across multiple lists and libraries.
Subscribe to:
Posts (Atom)